
You can either connect the physical device through USB to the local computer or use Android Studio to run phone emulators.
1. The first step in the process is to ensure that Developer Mode is activated. We can open Settings, go to ‘About Phone’, and then click the ‘Build Number’ seven times.
Open Settings -> About Phone -> tap ‘Build Number’ 7 times
2. Next, we need to check that USB debugging is enabled and OEM is unlocked. Open Settings, go to Developer Options, and enable both options.
Open Settings -> Developer Options -> enable both options
3. Download and install adb and fastboot [platform tools]. These are required for Android Studio too.
https://developer.android.com/studio#downloads
4. Test if adb picks up the target device connected to the local computer through USB.
platform-tools % ./adb devices
daemon not running; starting now at tcp:5037
daemon started successfully
List of devices attached
FA8291A03070	device

# If you have multiple devices, then you need to use the -s switch
# to specify which device the commands are passed to.
# For example:
./adb -s FA8291A03070 pull /data/user/0/com.els.pwdmanager/databases/pwdmanager.db
5. Reboot the device to bootloader using the following adb command:
./adb reboot bootloader6. Choose either standard or critical unlock and run its associated fastboot command.
Standard ⇒ ./fastboot flashing unlock
OR
Critical ⇒ ./fastboot flashing unlock_critical
Standard was used for testing
7. Follow the prompts on the phone screen, and then reboot the device when prompted.
8. Proceed through and finish the Android setup wizard.
9. Download Magisk Manager APK and the boot image for the device’s current build onto the device. Please note, that for the next steps to work, the boot image’s build version should match exactly what is currently running on the phone.
https://github.com/topjohnwu/Magisk/releases
Factory Images: https://developers.google.com/android/images
10. Follow through Step 2 and enable USB Debugging.
11. Install Magisk Manager allowing from ‘Unknown Source’.
12. In the Magisk Manager app, press the Install button, then choose the matching version boot image file. It is named ‘boot.img’.
14. After Magisk has patched the boot image, you need to pull it off the device. You can use adb’s pull command to download files from the device to the computer. Open adb in a terminal on your computer, and type:
./adb pull /sdcard/MagiskManager/patched_boot.img15. After copying the patched boot image to your local computer, you will need to boot the device into the bootloader. Use the following adb command from a terminal on your local computer:
./adb reboot bootloader16. After the device has booted into bootloader, flash the patched boot image with the following fastboot command:
./fastboot flash boot patched_boot.img17. Next we need to reboot the device and verify if we have achieved root/admin access:
./fastboot reboot18. Open the Magisk Manager app after the phone has rebooted. Check and it should confirm your root status! You should see that the ‘Superuser’ option is now enabled.
19. Open Burp and go to download the Burp CA Certificate:
20. Click on “Import / Export CA certificate” and export the certificate in DER format. Name it “burp.der” and save it to the phone. We will need to convert the certificate to PEM format, determine the hash of “burp.pem”, rename the certificate to match its hash, and then copy the certificate to the rooted device. Use the following commands:
# Use openssl to convert DER to PEM:
$ openssl x509 -inform DER -in burp.der -out burp.pem

# Then output the hash with subject_hash_old and rename the file:
$ openssl x509 -inform PEM -subject_hash_old -in burp.pem | head -1
# the output is <cert>.0

# Now rename “pem” file to what you got:
$ mv burp.pem <cert>.0

# then mv the downloaded CA Certificate for Burp to
$ adb root #run adb as root
$ adb remount #remount the filesystem
$ adb shell
$ mv /sdcard/<cert>.0 /system/etc/security/cacerts/
$ chmod 644 /system/etc/security/cacerts/<cert>.0

# Then restart the device!

!!!!!!!!!!!!!!!!!!!!!!!!!!!!!!!!!!!!!!!!!!!!!!
# If you get an error about it being a production build and cannot use 'adb root', then follow these commands:
walleye:/ # su
walleye:/ # ls -lah /storage/emulated/0/Download
total 60M
-rw-rw---- 1 root everybody 1.2K 2022-09-19 21:38 9a5ba575.0
-rw-rw---- 1 root everybody  11M 2022-09-18 17:52 Magisk-38ab6858(25203).apk
-rw-rw---- 1 root everybody 664K 2022-09-18 16:26 adb_root.zip
-rw-rw---- 1 root everybody  13M 2022-09-18 15:54 app-debug.apk
-rw-rw---- 1 root everybody  32M 2022-09-18 15:54 boot.img
-rw-rw---- 1 root everybody  32M 2022-09-18 17:53 magisk_patched-25203_SaeeY.img
-rw-rw---- 1 root everybody  32M 2022-09-18 16:15 magisk_patched_iaEyG.img
walleye:/ # pwd
/
walleye:/ # mkdir -m 700 /storage/emulated/0/Download/certs
walleye:/ # cp /system/etc/security/cacerts/* /storage/emulated/0/Download/certs
walleye:/ # mount -t tmpfs tmpfs /system/etc/security/cacerts
walleye:/ # mv /storage/emulated/0/Download/certs/* /system/etc/security/cacerts/
walleye:/ # mv /storage/emulated/0/Download/9a5ba575.0 /system/etc/security/cacerts/
walleye:/ # chown root:root /system/etc/security/cacerts/*
walleye:/ # chmod 644 /system/etc/security/cacerts/*
walleye:/ # chcon u:object_r:system_file:s0 /system/etc/security/cacerts/*

# Then restart the device!
User-installed certs and Device Admin certs are no longer trusted by default for apps targeting API level 24+
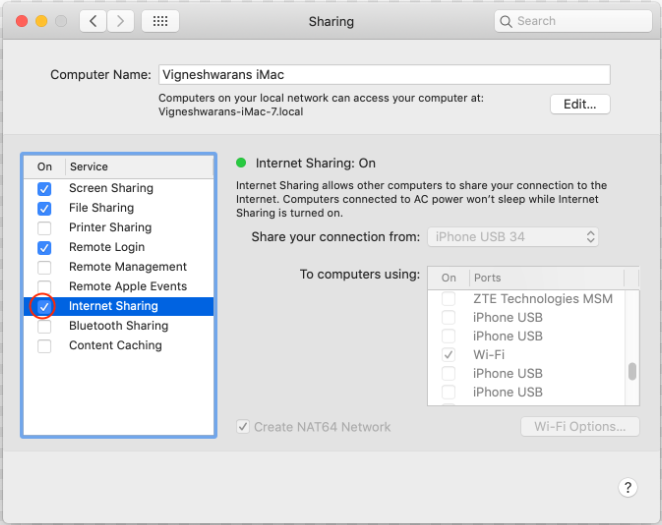
1. You can allow the rooted device to share a connection to the internet through a MacBook. Open ‘System Preferences’ and navigate to ‘Sharing’. The following screenshot shows the settings used to share a MacBook’s internet connection:
2. Run the ‘ifconfig’ command in a terminal and take note of the IP address for the bridge that is being used to share. The following output shows the IP address to be 192.168.126.1:
bridge102: flags=8863<UP,BROADCAST,SMART,RUNNING,SIMPLEX,MULTICAST> mtu 1500
	options=3<RXCSUM,TXCSUM>
	ether 7a:4f:43:09:89:66
	inet 192.168.126.1 netmask 0xffffff00 broadcast 192.168.126.255
	inet6 fe80::784f:43ff:fe09:8966%bridge102 prefixlen 64 scopeid 0x1a
	Configuration:
		id 0:0:0:0:0:0 priority 0 hellotime 0 fwddelay 0
		maxage 0 holdcnt 0 proto stp maxaddr 100 timeout 1200
		root id 0:0:0:0:0:0 priority 0 ifcost 0 port 0
		ipfilter disabled flags 0x0
	member: vmenet2 flags=3<LEARNING,DISCOVER>
	        ifmaxaddr 0 port 25 priority 0 path cost 0
	nd6 options=201<PERFORMNUD,DAD>
	media: autoselect
	status: active
3. Go back to Burp Suite, navigate to the “Proxy Tab”, and open the tab labeled “Options”. In the “Proxy listeners” section, add a new listener with the following configuration:
*:8082###port: 8082Bind to address: *4. Go to the device’s settings and connect to the shared Wifi from the MacBook.
5. Go to the Advanced Settings under the password input field in the settings.
6. Enable Manual proxy and set the port to 8082 and the IP adress to match the bridge IP address found earlier.
IN CASE OF A NEED TO FACTORY RESET THE PHONE WITH A NEW BOOT IMAGE ( OR ROLLING BACK TO PREVIOUS API… )
Take note of the flashall.sh script that is found in the Factory Image downlaod. It will tell exactly what needs to flashed and in what order. You can run the script manually through the terminal on your local computer with the phone device connected by USB.
fastboot flash bootloader bootloader-walleye-mw8998-003.0085.00.img
fastboot reboot-bootloader

fastboot flash radio radio-walleye-g8998-00034-2006052136.img
fastboot reboot-bootloader

fastboot -w update image-walleye-rp1a.201005.004.a1.zip